
Вид с рабочего места
Сейчас майские праздники и я нахожусь в деревне далеко от Москвы (>300 км). Деревня достаточно глухая, стоит в лесах и полях Калужской области, но интернет мне тут жизненно необходим для работы и он был сделан. Описание настройки 3G интернета в деревне было опубликовано на дружественном сайте 4ham.ru (статья: «Настройка 3G Интернета в глухой деревне Калужской области» ), как нибудь перенесу её и сюда.
Интернет есть, работать удаленно можно (так зачем же ехать в Москву на работу между майскими праздниками 🙂 ), но еще очень хотелось иметь офисный стационарный телефон, не люблю я софтфоны.

IP телефон Yealink SIP-T26P
На складе был найден IP телефон Yealink SIP-T26P. Данный телефон удобен тем, что может быть OpenVPN клиентом.
В настройках OpenVPN клиента, есть некоторые особенности, на которые я и хочу обратить внимание в данной статье.
Настройка
Отступление
Ни какие особо хитрые или необычные настройки OpenVPN сервера я не буду описывать, похожих инструкций и более подробных полон интернет, я опишу тот минимум, который необходим для работы с телефоном Yealink.
Что имеем
Linux CentOS release 6.5 (64 bit)
cat /etc/redhat-release
CentOS release 6.5 (Final)

cat /proc/version
Linux version 2.6.32-431.5.1.el6.x86_64 (mockbuild@c6b10.bsys.dev.centos.org) (gcc version 4.4.7 20120313 (Red Hat 4.4.7-4) (GCC) ) #1 SMP Wed Feb 12 00:41:43 UTC 2014
IP телефон Yealink SIP-T26P, Firmware Version 6.72.0.30
Настройка OpenVPN сервера
Как уже писал выше, я не буду разжёвывать процедуру настройки, акцентирую внимание только на моментах необходимых для телефона.
Установка необходимых пакетов
yum update
yum install -y openvpn easy-rsa
Создание ключей и сертификатов с помощью Easy-RSA
Копируем необходимые файлы
mkdir -p /etc/openvpn/easy-rsa/keys
cp -rf /usr/share/easy-rsa/2.0/* /etc/openvpn/easy-rsa/
Редактируем файл /etc/openvpn/easy-rsa/vars
Образец:
# Increase this to 2048 if you
# are paranoid.  This will slow
# down TLS negotiation performance
# as well as the one-time DH parms
# generation process.
# Yealink поддерживает DH 1024, по умолчанию стоит 2048

export KEY_SIZE=1024  # These are the default values for fields

# which will be placed in the certificate.
# Don't leave any of these fields blank.

export KEY_COUNTRY="RU"
export KEY_PROVINCE="Moscow"
export KEY_CITY="Moscow"
export KEY_ORG="Trust.com"
export KEY_EMAIL="support@test.local"
export KEY_OU="IT"
Обратите внимание на параметр KEY_SIZE=1024, это один из тех параметров которые нужно настроить для Yealink.
Настройка конфигурационного файла OpenSSL /etc/openvpn/easy-rsa/openssl-1.0.0.cnf
Yealink поддерживает Signature hash algorithm SHA1 и MD5, в OpenSSL по умолчанию SHA256, меняем параметры.
[ CA_default ]
default_md= sha1

[ req ]
default_md= sha1
Подготовка к созданию ключей и сертификатов
cd /etc/openvpn/easy-rsa
source ./vars
./clean-all
Создание Certificate Authority, файл ca.key (он нужен и серверу и клиенту)
./build-ca
Создаём сертификат и ключ для сервера
./build-key-server server
Создаем ключ по алгоритму Diffie-Hellman
./build-dh
Создаём сертификат и ключ для клиента
./build-key yealink
Настройка конфигурационного файла OpenVPN сервера
Копируем образец конфигурационного файла
cp /usr/share/doc/openvpn-2.3.2/sample/sample-config-files/server.conf /etc/openvpn/
Пример настроек конфигурационного файла
#################################################
# Sample OpenVPN 2.0 config file for            #
# multi-client server.                          #
#                                               #
# This file is for the server side              #
# of a many-clients <-> one-server              #
# OpenVPN configuration.                        #
#                                               #
# OpenVPN also supports                         #
# single-machine <-> single-machine             #
# configurations (See the Examples page         #
# on the web site for more info).               #
#                                               #
# This config should work on Windows            #
# or Linux/BSD systems.  Remember on            #
# Windows to quote pathnames and use            #
# double backslashes, e.g.:                     #
# "C:\\Program Files\\OpenVPN\\config\\foo.key" #
#                                               #
# Comments are preceded with '#' or ';'         #
#################################################

# Which local IP address should OpenVPN
# listen on? (optional)
local 10.21.0.205

# Which TCP/UDP port should OpenVPN listen on?
# If you want to run multiple OpenVPN instances
# on the same machine, use a different port
# number for each one.  You will need to
# open up this port on your firewall.
port 1726

# TCP or UDP server?
;proto tcp
proto udp

# "dev tun" will create a routed IP tunnel,
# "dev tap" will create an ethernet tunnel.
# Use "dev tap0" if you are ethernet bridging
# and have precreated a tap0 virtual interface
# and bridged it with your ethernet interface.
# If you want to control access policies
# over the VPN, you must create firewall
# rules for the the TUN/TAP interface.
# On non-Windows systems, you can give
# an explicit unit number, such as tun0.
# On Windows, use "dev-node" for this.
# On most systems, the VPN will not function
# unless you partially or fully disable
# the firewall for the TUN/TAP interface.
;dev tap
dev tun

# Windows needs the TAP-Win32 adapter name
# from the Network Connections panel if you
# have more than one.  On XP SP2 or higher,
# you may need to selectively disable the
# Windows firewall for the TAP adapter.
# Non-Windows systems usually don't need this.
;dev-node MyTap

# SSL/TLS root certificate (ca), certificate
# (cert), and private key (key).  Each client
# and the server must have their own cert and
# key file.  The server and all clients will
# use the same ca file.
#
# See the "easy-rsa" directory for a series
# of scripts for generating RSA certificates
# and private keys.  Remember to use
# a unique Common Name for the server
# and each of the client certificates.
#
# Any X509 key management system can be used.
# OpenVPN can also use a PKCS #12 formatted key file
# (see "pkcs12" directive in man page).
ca /etc/openvpn/easy-rsa/keys/ca.crt
cert /etc/openvpn/easy-rsa/keys/server.crt
key /etc/openvpn/easy-rsa/keys/server.key  # This file should be kept secret

# Diffie hellman parameters.
# Generate your own with:
#   openssl dhparam -out dh1024.pem 1024
# Substitute 2048 for 1024 if you are using
# 2048 bit keys.
dh /etc/openvpn/easy-rsa/keys/dh1024.pem

# Configure server mode and supply a VPN subnet
# for OpenVPN to draw client addresses from.
# The server will take 10.8.0.1 for itself,
# the rest will be made available to clients.
# Each client will be able to reach the server
# on 10.8.0.1. Comment this line out if you are
# ethernet bridging. See the man page for more info.
server 10.21.4.0 255.255.255.0

# Maintain a record of client <-> virtual IP address
# associations in this file.  If OpenVPN goes down or
# is restarted, reconnecting clients can be assigned
# the same virtual IP address from the pool that was
# previously assigned.
;ifconfig-pool-persist ipp.txt

# Configure server mode for ethernet bridging.
# You must first use your OS's bridging capability
# to bridge the TAP interface with the ethernet
# NIC interface.  Then you must manually set the
# IP/netmask on the bridge interface, here we
# assume 10.8.0.4/255.255.255.0.  Finally we
# must set aside an IP range in this subnet
# (start=10.8.0.50 end=10.8.0.100) to allocate
# to connecting clients.  Leave this line commented
# out unless you are ethernet bridging.
;server-bridge 10.8.0.4 255.255.255.0 10.8.0.50 10.8.0.100

# Configure server mode for ethernet bridging
# using a DHCP-proxy, where clients talk
# to the OpenVPN server-side DHCP server
# to receive their IP address allocation
# and DNS server addresses.  You must first use
# your OS's bridging capability to bridge the TAP
# interface with the ethernet NIC interface.
# Note: this mode only works on clients (such as
# Windows), where the client-side TAP adapter is
# bound to a DHCP client.
;server-bridge

# Push routes to the client to allow it
# to reach other private subnets behind
# the server.  Remember that these
# private subnets will also need
# to know to route the OpenVPN client
# address pool (10.8.0.0/255.255.255.0)
# back to the OpenVPN server.
push "route 10.21.0.0 255.255.240.0"
;push "route 192.168.2 255.255.255.0"

# To assign specific IP addresses to specific
# clients or if a connecting client has a private
# subnet behind it that should also have VPN access,
# use the subdirectory "ccd" for client-specific
# configuration files (see man page for more info).

# EXAMPLE: Suppose the client
# having the certificate common name "Thelonious"
# also has a small subnet behind his connecting
# machine, such as 192.168.40.128/255.255.255.248.
# First, uncomment out these lines:
;client-config-dir ccd
;route 192.168.40.128 255.255.255.248
# Then create a file ccd/Thelonious with this line:
#   iroute 192.168.40.128 255.255.255.248
# This will allow Thelonious' private subnet to
# access the VPN.  This example will only work
# if you are routing, not bridging, i.e. you are
# using "dev tun" and "server" directives.

# EXAMPLE: Suppose you want to give
# Thelonious a fixed VPN IP address of 10.9.0.1.
# First uncomment out these lines:
;client-config-dir ccd
;route 10.9.0.0 255.255.255.252
# Then add this line to ccd/Thelonious:
#   ifconfig-push 10.9.0.1 10.9.0.2

# Suppose that you want to enable different
# firewall access policies for different groups
# of clients.  There are two methods:
# (1) Run multiple OpenVPN daemons, one for each
#     group, and firewall the TUN/TAP interface
#     for each group/daemon appropriately.
# (2) (Advanced) Create a script to dynamically
#     modify the firewall in response to access
#     from different clients.  See man
#     page for more info on learn-address script.
;learn-address ./script

# If enabled, this directive will configure
# all clients to redirect their default
# network gateway through the VPN, causing
# all IP traffic such as web browsing and
# and DNS lookups to go through the VPN
# (The OpenVPN server machine may need to NAT
# or bridge the TUN/TAP interface to the internet
# in order for this to work properly).
;push "redirect-gateway def1 bypass-dhcp"

# Certain Windows-specific network settings
# can be pushed to clients, such as DNS
# or WINS server addresses.  CAVEAT:
# http://openvpn.net/faq.html#dhcpcaveats
# The addresses below refer to the public
# DNS servers provided by opendns.com.
;push "dhcp-option DNS 208.67.222.222"
;push "dhcp-option DNS 208.67.220.220"

# Uncomment this directive to allow different
# clients to be able to "see" each other.
# By default, clients will only see the server.
# To force clients to only see the server, you
# will also need to appropriately firewall the
# server's TUN/TAP interface.
client-to-client

# Uncomment this directive if multiple clients
# might connect with the same certificate/key
# files or common names.  This is recommended
# only for testing purposes.  For production use,
# each client should have its own certificate/key
# pair.
#
# IF YOU HAVE NOT GENERATED INDIVIDUAL
# CERTIFICATE/KEY PAIRS FOR EACH CLIENT,
# EACH HAVING ITS OWN UNIQUE "COMMON NAME",
# UNCOMMENT THIS LINE OUT.
;duplicate-cn

# The keepalive directive causes ping-like
# messages to be sent back and forth over
# the link so that each side knows when
# the other side has gone down.
# Ping every 10 seconds, assume that remote
# peer is down if no ping received during
# a 120 second time period.
keepalive 10 120

# For extra security beyond that provided
# by SSL/TLS, create an "HMAC firewall"
# to help block DoS attacks and UDP port flooding.
#
# Generate with:
#   openvpn --genkey --secret ta.key
#
# The server and each client must have
# a copy of this key.
# The second parameter should be '0'
# on the server and '1' on the clients.
;tls-auth ta.key 0 # This file is secret

# Select a cryptographic cipher.
# This config item must be copied to
# the client config file as well.
;cipher BF-CBC        # Blowfish (default)
;cipher AES-128-CBC   # AES
;cipher DES-EDE3-CBC  # Triple-DES

# Enable compression on the VPN link.
# If you enable it here, you must also
# enable it in the client config file.
comp-lzo no

# The maximum number of concurrently connected
# clients we want to allow.
;max-clients 100

# It's a good idea to reduce the OpenVPN
# daemon's privileges after initialization.
#
# You can uncomment this out on
# non-Windows systems.
user openvpn
group openvpn

# The persist options will try to avoid
# accessing certain resources on restart
# that may no longer be accessible because
# of the privilege downgrade.
persist-key
persist-tun

# Output a short status file showing
# current connections, truncated
# and rewritten every minute.
status /var/log/openvpn/openvpn-status.log

# By default, log messages will go to the syslog (or
# on Windows, if running as a service, they will go to
# the "\Program Files\OpenVPN\log" directory).
# Use log or log-append to override this default.
# "log" will truncate the log file on OpenVPN startup,
# while "log-append" will append to it.  Use one
# or the other (but not both).
;log         /var/log/openvpn/openvpn.log
log-append  /var/log/openvpn/openvpn.log

# Set the appropriate level of log
# file verbosity.
#
# 0 is silent, except for fatal errors
# 4 is reasonable for general usage
# 5 and 6 can help to debug connection problems
# 9 is extremely verbose
verb 5

# Silence repeating messages.  At most 20
# sequential messages of the same message
# category will be output to the log.
# Не записывать больше повторяющихся сообщений сразу
mute 20
Если у вас, так же как и у меня, OpenVPN сервер находится за NAT/Firewall не забудьте пробросить UDP порт.
Запуск OpenVPN сервера
chkconfig openvpn on
/etc/init.d/openvpn start
Настройка IP телефона Yealink для работы с OpenVPN сервером
Для телефона необходимо создать tar файл с конфигурационным файлом клиента и ключами.
Документация подробно описывающий настройку: Настройка OpenVPN в Yealink
Суть вкратце
Подготовим необходимые подкаталоги и файлы для создания tar файла
mkdir -p /etc/openvpn/client/keys
cp /etc/openvpn/easy-rsa/keys/ca.crt /etc/openvpn/client/keys
cp /etc/openvpn/easy-rsa/keys/yealink.crt /etc/openvpn/client/keys
cp /etc/openvpn/easy-rsa/keys/yealink.key /etc/openvpn/client/keys
Конфигурационный файл клиента vpn.cnf
Файл кладём в /etc/openvpn/client
setenv SERVER_POLL_TIMEOUT 4
reneg-sec 604800
sndbuf 100000
rcvbuf 100000
auth-retry nointeract

##############################################
# Sample client-side OpenVPN 2.0 config file #
# for connecting to multi-client server.     #
#                                            #
# This configuration can be used by multiple #
# clients, however each client should have   #
# its own cert and key files.                #
#                                            #
# On Windows, you might want to rename this  #
# file so it has a .ovpn extension           #
##############################################

# Specify that we are a client and that we
# will be pulling certain config file directives
# from the server.
client

# Use the same setting as you are using on
# the server.
# On most systems, the VPN will not function
# unless you partially or fully disable
# the firewall for the TUN/TAP interface.
;dev tap
dev tun
dev-type tun

# Windows needs the TAP-Win32 adapter name
# from the Network Connections panel
# if you have more than one.  On XP SP2,
# you may need to disable the firewall
# for the TAP adapter.
;dev-node MyTap

# Are we connecting to a TCP or
# UDP server?  Use the same setting as
# on the server.
;proto tcp
;proto udp

# The hostname/IP and port of the server.
# You can have multiple remote entries
# to load balance between the servers.
remote xxx.xxx.xxx.xxx 1726 udp
;remote my-server-2 1194

# Choose a random host from the remote
# list for load-balancing.  Otherwise
# try hosts in the order specified.
;remote-random

# Keep trying indefinitely to resolve the
# host name of the OpenVPN server.  Very useful
# on machines which are not permanently connected
# to the internet such as laptops.
;resolv-retry infinite

# Most clients don't need to bind to
# a specific local port number.
nobind

# Downgrade privileges after initialization (non-Windows only)
;user nobody
;group nobody

# Try to preserve some state across restarts.
;persist-key
;persist-tun

# If you are connecting through an
# HTTP proxy to reach the actual OpenVPN
# server, put the proxy server/IP and
# port number here.  See the man page
# if your proxy server requires
# authentication.
;http-proxy-retry # retry on connection failures
;http-proxy [proxy server] [proxy port #]

# Wireless networks often produce a lot
# of duplicate packets.  Set this flag
# to silence duplicate packet warnings.
;mute-replay-warnings

# SSL/TLS parms.
# See the server config file for more
# description.  It's best to use
# a separate .crt/.key file pair
# for each client.  A single ca
# file can be used for all clients.
ca /config/openvpn/keys/ca.crt
cert /config/openvpn/keys/yealink.crt
key /config/openvpn/keys/yealink.key

# Verify server certificate by checking
# that the certicate has the nsCertType
# field set to "server".  This is an
# important precaution to protect against
# a potential attack discussed here:
#  http://openvpn.net/howto.html#mitm
#
# To use this feature, you will need to generate
# your server certificates with the nsCertType
# field set to "server".  The build-key-server
# script in the easy-rsa folder will do this.
ns-cert-type server

# If a tls-auth key is used on the server
# then every client must also have the key.
;tls-auth ta.key 1

# Select a cryptographic cipher.
# If the cipher option is used on the server
# then you must also specify it here.
;cipher x

# Enable compression on the VPN link.
# Don't enable this unless it is also
# enabled in the server config file.
comp-lzo no

# Set log file verbosity.
verb 3

# Silence repeating messages
;mute 20
Незабываем в remote вместо xxx.xxx.xxx.xxx указать ваш адрес OpenVPN сервера.
Создание tar файла и его загрузка в телефон
cd /etc/openvpn/client
tar -cvpf openvpn.tar *
Полученный openvpn.tar файл загружаем в телефон через web интерфейс.
Заходим в меню Networking > Advanced, внизу будет меню «VPN», нужно поставить «Enabled» и загрузить сделанный ранее openvpn.tar файл.
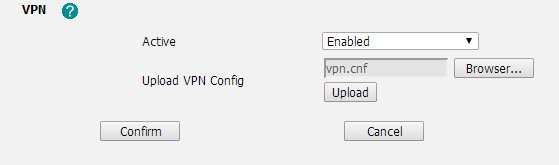
После перезагрузки телефона VPN должен подняться и на дисплее телефона, в правом верхнем углу должна появиться надпись «VPN».
P.S. Если вам необходимо, что бы сервер выполнял функцию маршрутизатора, незабываем включить маршрутизацию:
/sbin/sysctl -w net.ipv4.ip_forward=1
P.P.S. Еще раз повторюсь, данная статья не является подробным и полным описанием настройки OpenVPN сервера, это всего лишь пример настройки, который раскрывает особенности настройки OpenVPN для Yealink с которыми я столкнулся.
Похожие записи...
 Windows 10. VPN. «Модем или другое устройство связи уже используется или не настроено»
 Windows 11. Не работает обновление, не входит в OneDrive, OneNote и другие Microsoft сервисы
 Попытка взлома Mikrotik?
 Fail2ban и Nextcloud. Защита от подбора пароля с помощью
 Fail2Ban фильтр для phpMyAdmin 4.7x (маленькая заметка)
Latest posts by Андрей Торженов (see all)
- Куда переходить с Helpdesk OTRS? Альтернативы OTRS - 27/02/2022
- Windows 11. Не работает обновление, не входит в OneDrive, OneNote и другие Microsoft сервисы - 29/01/2022
- Попытка взлома Mikrotik? - 24/12/2021
- После обновления до Proxmox 7.1 не запускаются виртуальные машины - 28/11/2021
- libflashplayer.so пропатченный от Time bomb - 11/02/2021
Уведомление: Контроль качества соединения 3G интернет на MikroTik | 2keep.net